|
|
Post by The High Flyer on Aug 29, 2004 8:51:07 GMT -5
Oooh! Great idea Sarah! And I'll do a tutorial for the day Photoshop Style ;D Todays tutorial for Photoshop will be....Clouds in the background. 1. Start out with your picture. I'll use this one:  2. Now make a new layer. 3. Go to "Filter" and then down to "Render" and thenclick "Clouds". Make sure the colors you have set are the ones you want blended togather as clouds.So if you had black and white, it would turn out sorta grayish. 4. Change the opacity of the clouds till you can see your first layer with the picture pretty clearly. 5. Now erase away the clouds overlapping the picture. 6. Change the opacity of the cloud layer back to 100%. 7. This should be your ending result:  |
|
Alura
Humble Sidekick
 .jpg junkie
Posts: 146
|
Post by Alura on Aug 29, 2004 16:31:15 GMT -5
I never thought of doing it that way. I usually would cut the whole image out. Although if you wanted you could make a new image do the cloaud thing copy and paste the image and use a huge eraser tool and erase away the back ground.
|
|
|
|
Post by The Symbolic Sacrifice on Aug 29, 2004 23:11:03 GMT -5
Wow, thanks HF, I love these classes ;D Is there anyway that sarahprincess' post can be converted into Photoshop? I tried doing it on the photoshop and ended up with rainbow covering Johnny from head to foot  |
|
|
|
Post by The Hollow Horror on Aug 30, 2004 1:50:52 GMT -5
I went looking for the rainbow effect for photoshop, and heres the tutorial I found:
The first thing to do once you've opened the image is to add a new layer to the image by pressing Shift + Ctrl + N, followed by the Enter key. Once you've added your new layer, you need to right-click on the Paint Bucket Tool and select Gradient Tool. The image below should help avoid confusion.
Once you've selected the Gradient Tool, you need to click on the Gradient drop-down menu at the top and select the full-rainbow gradient. If you're not sure which one to choose, hover your mouse over a gradient to see what it's called.
After you have your gradient selected, you'll need to apply it to the image. You do this by placing your mouse in the bottom-left-hand corner of the image and dragging it to the top-right-hand corner of the image. After doing this, your image will simply be a rainbow. To fix this, you'll need to adopt the opacity settings below to your Layer Pallette.
|
|
|
|
Post by The Symbolic Sacrifice on Aug 30, 2004 6:37:39 GMT -5
OK heres my attempts at these... don't laugh OK? Rainbows 1st attempt on photoshop with paintshoppro directions  2nd attempt with Sarahs directions for photoshop  Thanks for coming back and doing that Sarah, I love the second one so much better. ;D Green clouds rule, thanks HF 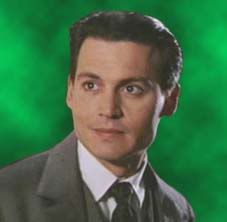 So are you guys going to do more of this please?  |
|
|
|
Post by The High Flyer on Aug 30, 2004 19:19:18 GMT -5
That looks marvelous, amazing, fantastic, absoltuely, 100%, definitly...stupendous? Yes, stupendous, SS ;D Ok, Heres the Photoshop Tutorial of the Day #2 Todayy, we will be making scanlines. They're not always pretty on a graphic, but it takes alot of experimenting. Ok, first off, take out your picture, I'll work with this one:  2. Now, make a new document and make it to the dimensions of 10x2 and transparent background. 3. Right click on the brush button to open a little menu next to it, and click the Pencil Tool. 4. Now draw a line at the top going all the way across, and make sure its the color you want the scanlines to be. 5. Press "CTRL" and "A" at the same time, it's an easy way to select all of your canvas. 6. Click Edit at the top and go down to "Define Pattern". click OK when the pop up comes up, asking you to title your pattern. 7. Now go back to your starting picture and and right click on the Gradient Tool to open the menu and then click Paintbucket. 8. At the top, where you can edit its options, change "Foreground" to "Pattern" and the make sure the pattern your using is the pattern you just made. It;ll be the newest one on the list of course. 9. Now start clicking at parts of the picture to fill them with the pattern. Your ending result should look somewhat like this:  If you think the lines are too close togather, try making the dimension of the pattern document 10x3 or so. And that concludes the second ever Photoshop Tutorial of the Day!! ;D |
|
|
|
Post by The Symbolic Sacrifice on Aug 30, 2004 23:38:04 GMT -5
OK this looks pretty difficult but I will have a go and come back and load it up  Thanks HF ;D -edit after trying for an hour *gulp* I think I am in way too deep for this one HF  Could you explain a few things before I try again? What are scanlines used for? A new document means another picture the same as the one I already have or just a white blank box? It wouldn't let me change it to 10 x 2 if you wanted it on the picture and I couldn't work out how to get the white blank box transparent...um 10 x 2 what cms/ mm/ pixels? I figured out how to get the pencil tool but everytime I tried to draw a line across the top I couldn't get it straight enough, how many lines do you have to draw? The control + A thing is good, that worked. The define pattern thing worked too. Then when I added it to the picture and used the paintbucket it just coloured it in white with a red line every now and then, because I only did one straight line. And believe me it looked nothing like your finished pic  I will try again tomorrow if you are willing to answer stupid questions and persevere. |
|
|
|
Post by The Hollow Horror on Aug 31, 2004 2:01:14 GMT -5
paintshop pro lesson 2 Silhouette effect Heres the pic: jdpicgo to adjust>brightness&contrast>brightness&contrast Set the Brightness to 30, and the Contrast to 98 Select Image>Decrease Colour Depth>2 Colours Now, set the Palette component to Grey Values, Reduction Method to Nearest Colour, and Palette Weight to Weighted go 2 Image>Increase Colour Depth Now duplicate the background layer. Soften the top layer. Reduce the transparency of the softened layer to around 50 Create two new layers. Fill them both with whatever gradients U want. Set top layer 2 multiply, and bottom layer 2 screen. Decrease the opacity of the screened layer to 50% DONE! Play around w/the opacity and gradients to get cool new looks! Here is mine:  |
|
|
|
Post by The High Flyer on Aug 31, 2004 17:06:01 GMT -5
OK this looks pretty difficult but I will have a go and come back and load it up Thanks HF ;D -edit after trying for an hour *gulp* I think I am in way too deep for this one HF Could you explain a few things before I try again? What are scanlines used for? A new document means another picture the same as the one I already have or just a white blank box? It wouldn't let me change it to 10 x 2 if you wanted it on the picture and I couldn't work out how to get the white blank box transparent...um 10 x 2 what cms/ mm/ pixels? I figured out how to get the pencil tool but everytime I tried to draw a line across the top I couldn't get it straight enough, how many lines do you have to draw? The control + A thing is good, that worked. The define pattern thing worked too. Then when I added it to the picture and used the paintbucket it just coloured it in white with a red line every now and then, because I only did one straight line. And believe me it looked nothing like your finished pic I will try again tomorrow if you are willing to answer stupid questions and persevere. OK, leme try to answer some of these qeustions good ;D 1. Well..theres not much use scanlines, I just think they look pretty cool, but not every picture can look good with scanlines. 2. New document as in a new white blank box  3. 10x2 Pixels and you make it Transparent by checking the circle next to the Transparent option at the bottom of the menu box thing where you determine the size of your new document. [If this made no sense, I'll try to take a screenshot later] 4. Well its only 2 pixels, so you should be able to draw one straight line at the top. You can zoom in to see the box better you know 5. It probably colored it into white becuase your box wasnt transparent. |
|
|
|
Post by The Symbolic Sacrifice on Aug 31, 2004 17:28:03 GMT -5
yipee!!! I'm a really really slow to understand, but once its explained so I can understand it, I pick it up pretty quick. I just have to find a better pic than this one for this type of graphic. But it looks great, thanks HF, for putting up with me being so dense.   ;D ;D ;D |
|
|
|
Post by The High Flyer on Sept 1, 2004 16:19:12 GMT -5
Very cool SS ;D Photoshop tutorial For the Day #3 Today we'll learn how to make faded edges. It's pretty easy. 1. I'll be using this pic today:  [It's really big, so this is just the TH. If you want the pic, PM me ] 2. Click the Rectangular Marquee Tool and change the feather to 20 or so pixels, depending on how far you want the fade you want to go in. The larger the number, the farther the fade goes towards the center. 3. Now select the whole canvas. 4. Right click and click "Select Inverse". 5. Now make sure the color you want the fade to be is in your color pallette. 6. Click the "Delete" button on your keyword and it should have colored it in to make it faded. 7. Press "CTRL" and "D" to deselect from the canvas. Here is what the end result should somewhat look like!:  |
|
|
|
Post by The Symbolic Sacrifice on Sept 1, 2004 16:35:05 GMT -5
I'm up to step 4 and when I click select inverse a little box comes up that says 'no pixels selected'  I put 20 pixels in the box to start with |
|
|
|
Post by The High Flyer on Sept 1, 2004 17:25:26 GMT -5
Did you select the whole canvas with the "Ctrl" and "A" thing?
|
|
|
|
Post by The Symbolic Sacrifice on Sept 1, 2004 17:29:51 GMT -5
yep I did remember that  and I did it before I went to select inverse
|
|
|
|
Post by The High Flyer on Sept 1, 2004 18:36:07 GMT -5
Hmmm.... I have no clue  Ohhh oh oh wait, I know!! You can't use the Ctrl + A trick with this one. you gotta manually select the whole canvas with your mouse. See if that works. |
|